Advertising data is inaccurate? How to configure Facebook advertising board?
2024-01-11 07: 17: 22
The traffic brought by domestic promotion through social media such as Weibo and WeChat is very considerable. The same social media can also be used as a traffic promotion method for cross-border independent stations. Facebook is the world's mainstream social media. Based on its capabilities such as audience positioning, customer remarketing, and advertising effectiveness analysis, more and more businesses choose Facebook as the main channel for overseas promotion and operations. Through this application, the system will assist Facebook in completing necessary data interactions and provide more functional support to improve the effectiveness of your store and protect your cross-border overseas operations.
Powerful feature set
Due to the privacy policy, the conversion data cannot be collected completely and correctly. Using shopyy's Facebook advertising toolset, you can obtain a variety of Facebook-related capabilities with one click, including advertising boards (auxiliary reporting of Facebook data), historical records (Facebook advertising tracking Event recording), Facebook Feed, FB Messenger, you can configure it according to your needs.
Advertising performance tracking optimization
Track visitor activities through Facebook pixel and record key events of visitors, so that each of your ad placements can correspond to a detailed performance data, allowing you to analyze website conversion effects, build looklike audiences (Looklike Audience), and achieve customer re-engagement. Marketing (Remarketing), of course, you can also use this performance data to measure the success of advertising, and optimize and upgrade advertising quality and strategies.
Advertising results are more accurate
Use the plug-in in the "Advertising Board" to report auxiliary data and upload the store's actual performance data to the Facebook advertising management tool. This can solve the problem of IOS 14 and above being unable to track regular events due to the privacy policy.
Recommended usage scenarios:
1 Record advertising tracking events and analyze advertising conversion funnels
2. Perform crowd positioning, advertising quality and strategy optimization based on advertising effectiveness data
Things to note
1 [Advertising Board] When linking the store's Facebook advertising account, be sure to ensure that the selected time zone is consistent with the time zone of the advertising account, so as to ensure that the relevant performance data is converted and counted correctly.
2 [Advertising Board] After downloading the advertising board tool, please unzip it and add it as a Chrome browser extension. After adding, please do not modify, delete or move the decompressed files, otherwise the functions will not work properly.
3 [Advertising Board] The advertising board tool can only obtain advertising performance data within the visible area. If you need to obtain other advertising data, please pull down the scroll bar vertically. It will be obtained again after the scrolling stops.
4 [Advertising Board] Please pay attention to the mall announcement content. If it prompts that the plug-in version has been updated, please [remove] the advertising board plug-in from the Google "Extensions" module, then re-download the file in the application, unzip and install it again. Get the latest plug-in features
Next, let’s take a look at shopoem, shopyy2.0, how to use the Facebook advertising board tool, log in to the backend, and install the FACEBOOK tool set
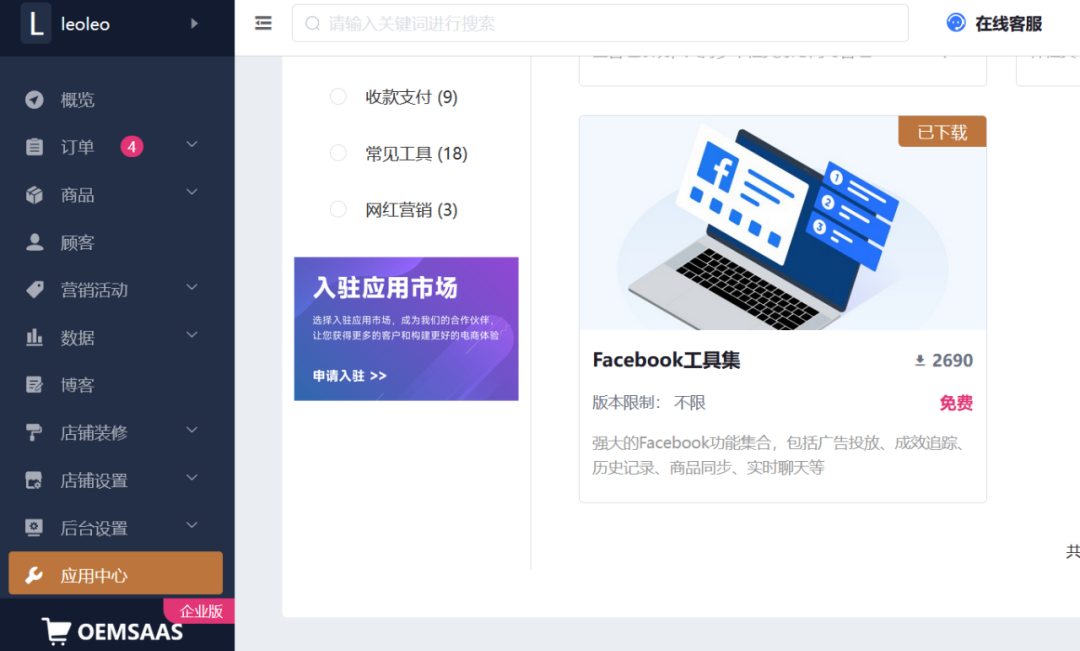
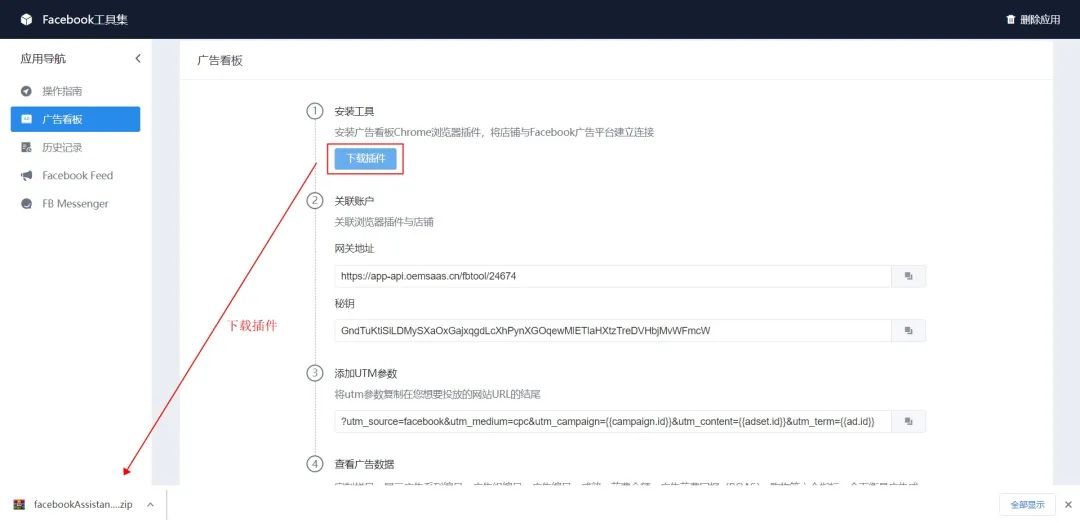
1【Advertising Board】You can use this tool to obtain real advertising performance data. First, install the advertising billboard Chrome browser plug-in to connect the store to the Facebook advertising platform. Click the download button to download the Chrome ad billboard tool plug-in
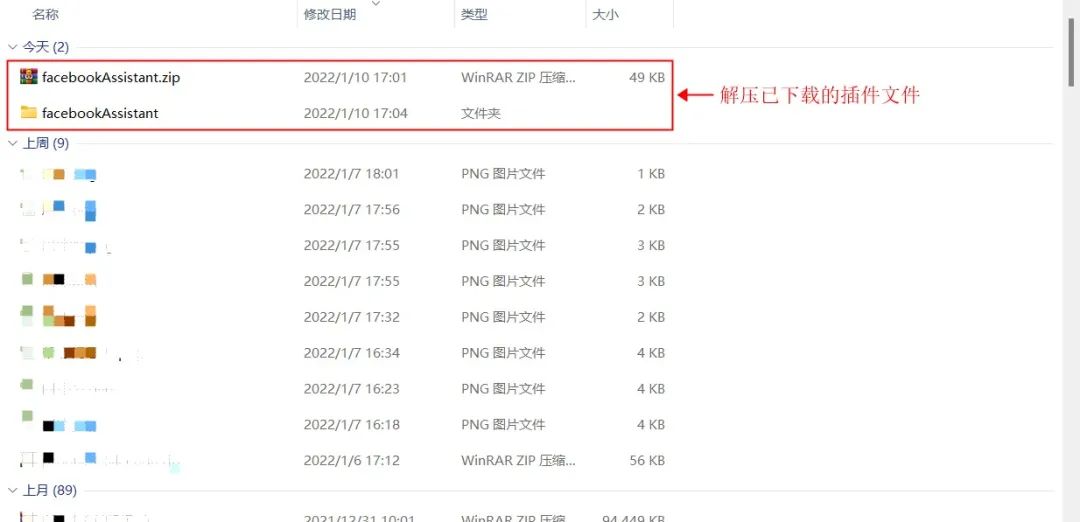
2【Advertising Board】Unzip the downloaded plug-in file. The decompressed file cannot be modified, moved or deleted, otherwise the Chrome plug-in will be unavailable.
3【Advertising Board】Click "┇" in the upper right corner of the browser → "Settings" → "Extensions" to open the Chrome browser plug-in management interface

4【Advertising Board】Enable developer mode
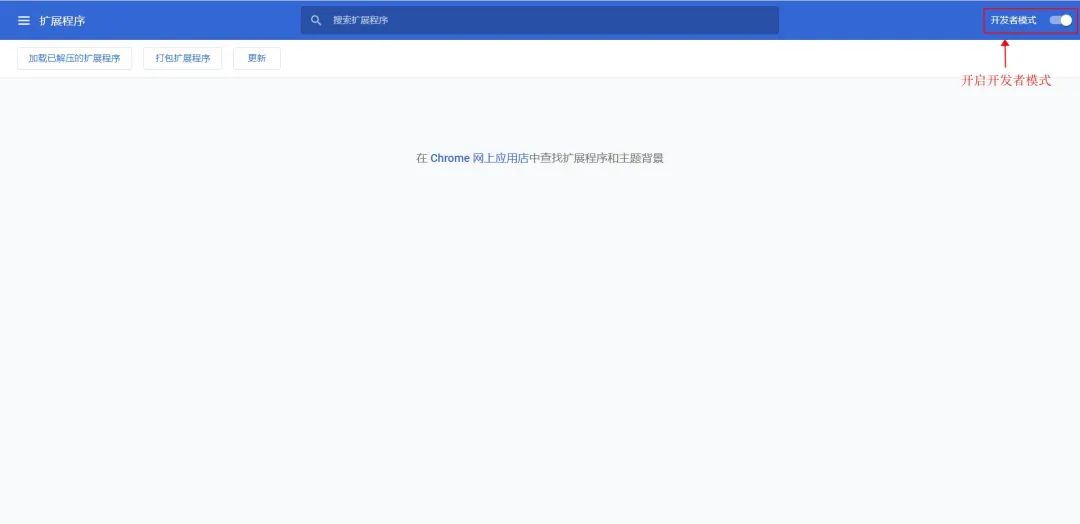
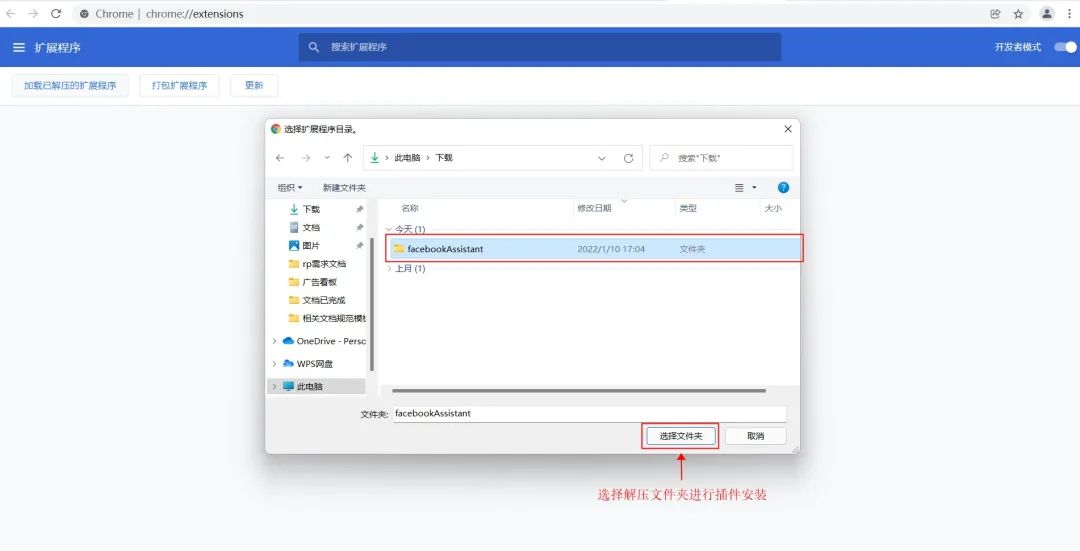
5[Advertising Board] Select the unzipped folder to install the plug-in
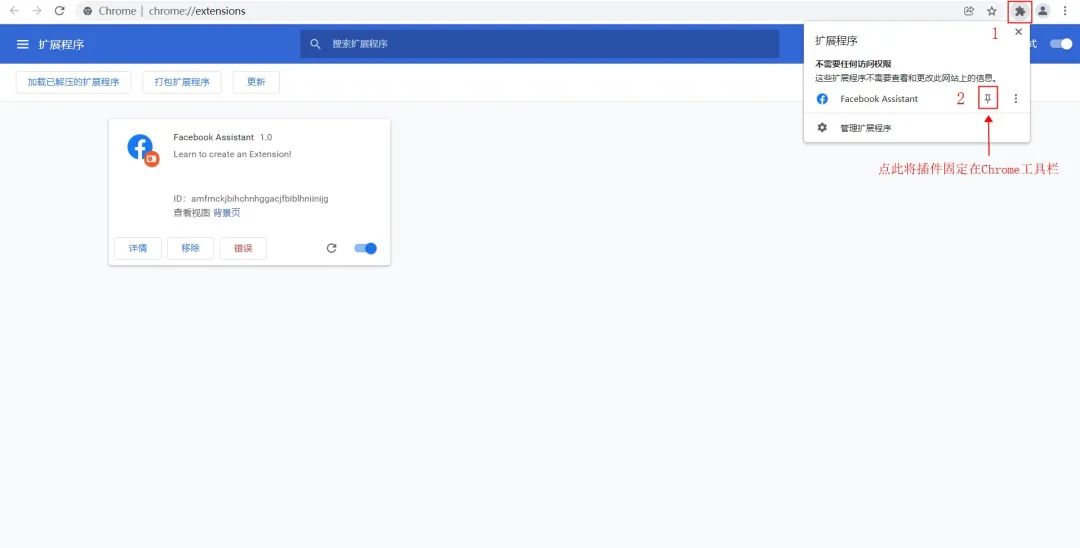
6[Advertising Board] will be displayed in the plug-in list after the installation is completed. Please enable the plug-in running status.

7【Advertising Board】For convenience, you can pin the plug-in to the Chrome toolbar
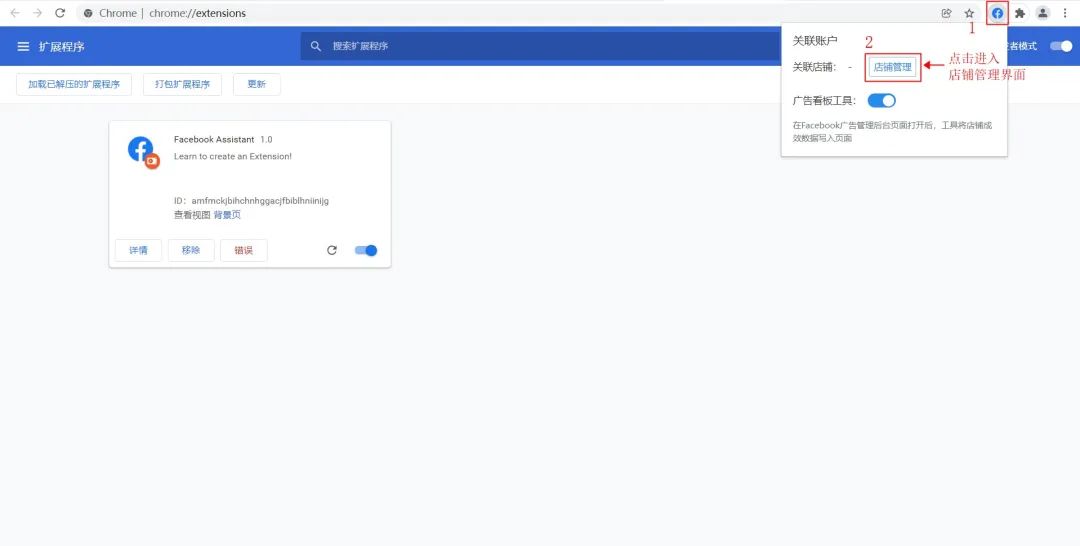
8 [Advertising Board] Open the plug-in and click on store management
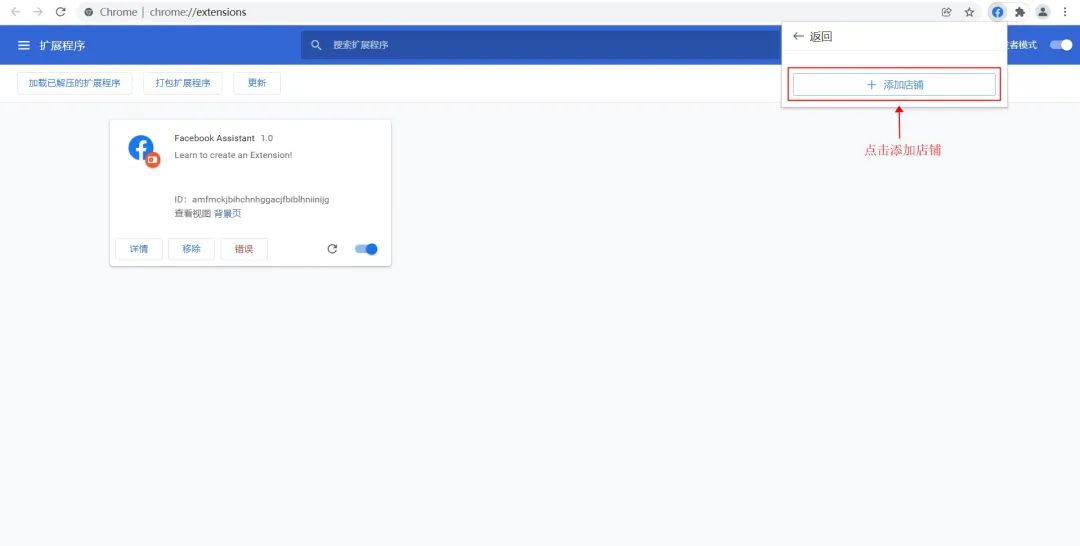
9【Advertising Board】Click to add a store to add multiple stores
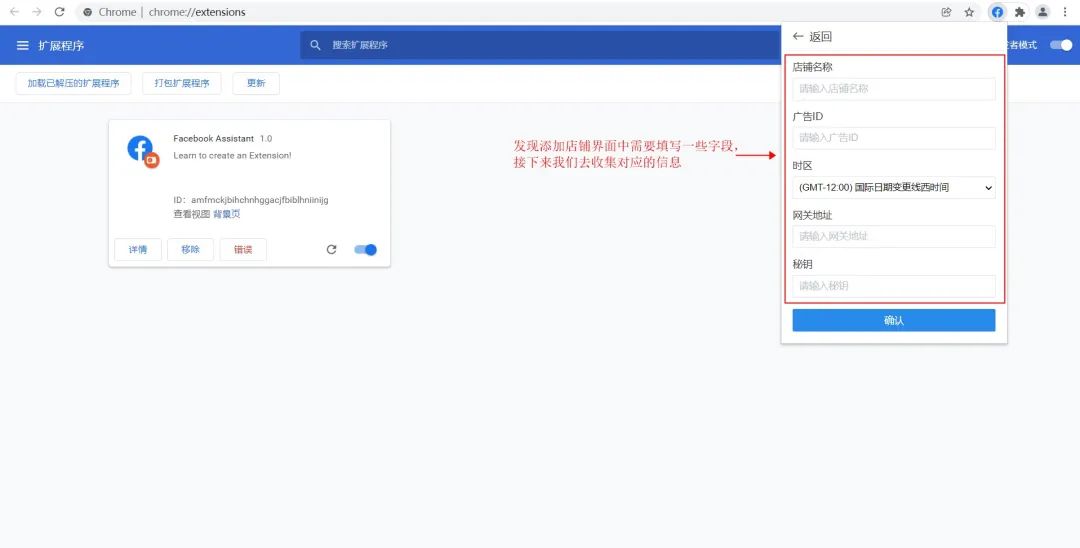
10 [Advertising Board] I found that some fields need to be filled in in the add store interface. Next, we will collect the corresponding information.
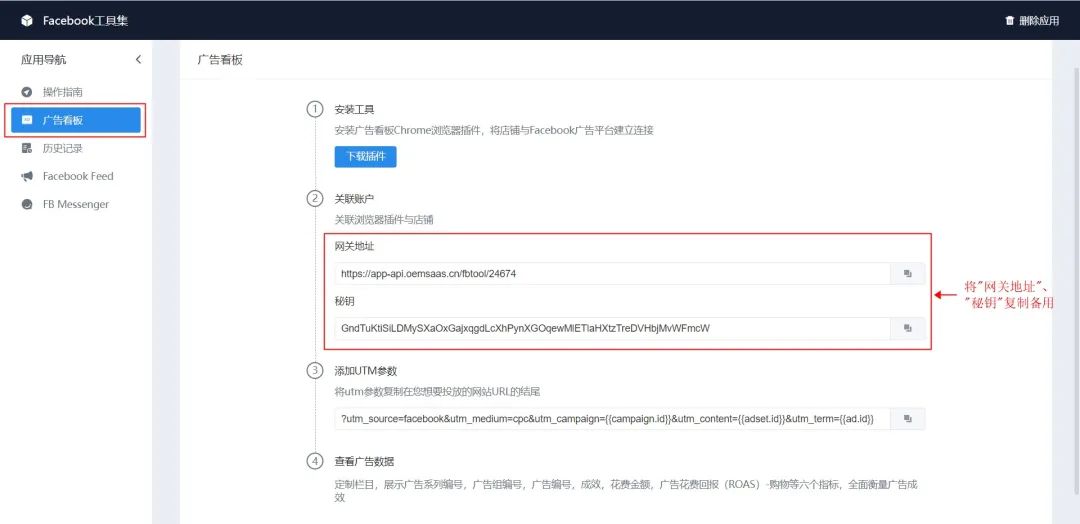
11[Advertising Board] Return to the application interface, click "Advertising Board", and copy the "Gateway Address" and "Secret Key" under this column for later use.
12【Advertising Board】Next, obtain the corresponding advertising ID and advertising time zone from Facebook. Log in to Facebook and enter the advertising management tool

13 [Advertising Board] Get the advertising account number. You can get it from act=advertising account number in the URL link or directly in the account list. Please copy this parameter aside for later use.

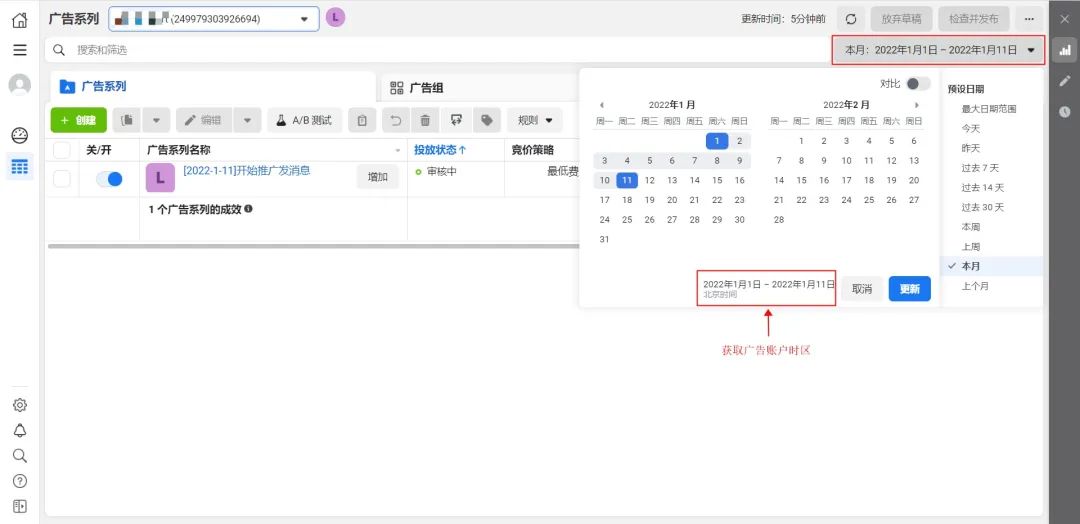
14 [Advertising Board] Get the time zone of the advertising account. Click the time filter in the upper right corner. You can easily view the time zone used by the account in the list. Please copy this parameter aside for later use.
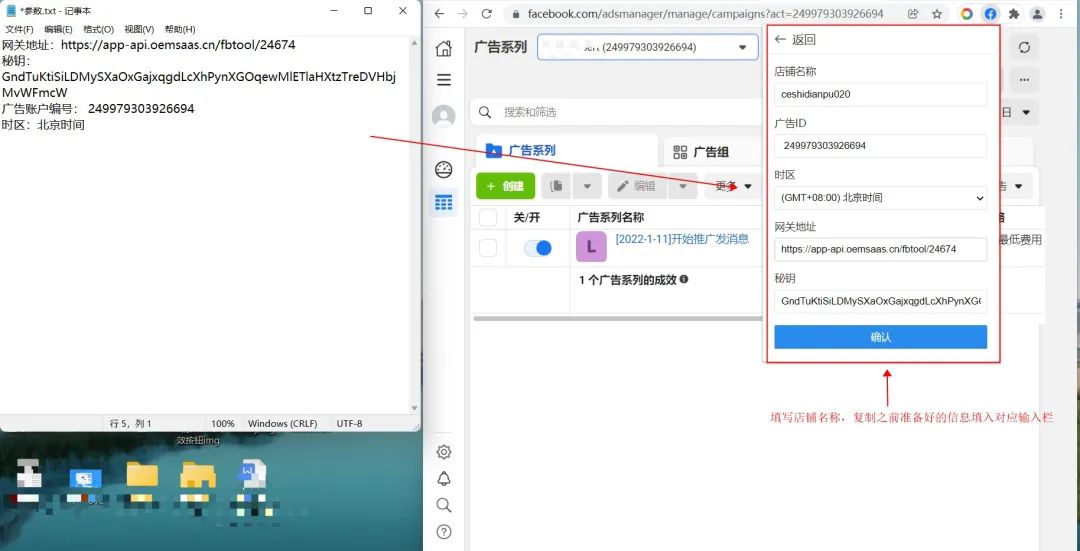
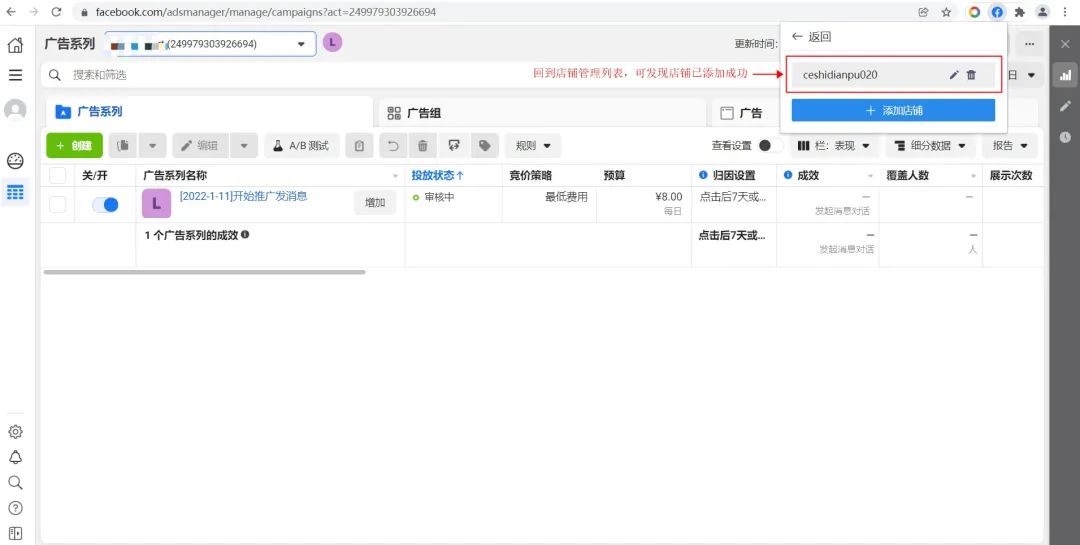
15 [Advertising Board] Open the Chrome advertising board tool plug-in again, click "Store Management" → "Add Store", fill in the store name, and copy the previously recorded information into the corresponding input box
16【Advertisement Board】Return to the store management list and you will find that the store has been added successfully.
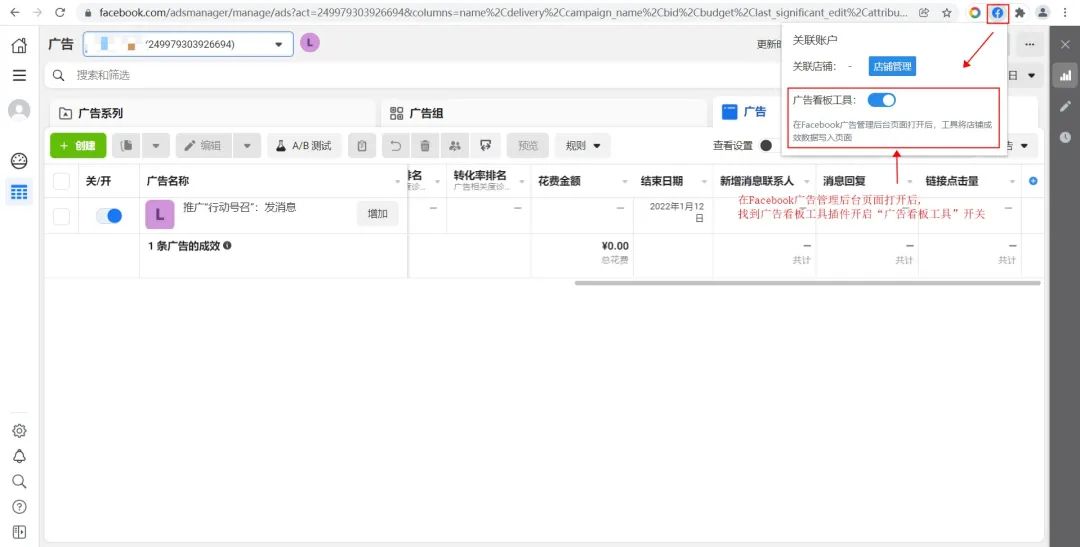
17 [Advertising Board] After opening the Facebook advertising management backend page, find the Advertising Board Tool plug-in in the plug-in list in the upper right corner, and turn on the "Advertising Board Tool" switch
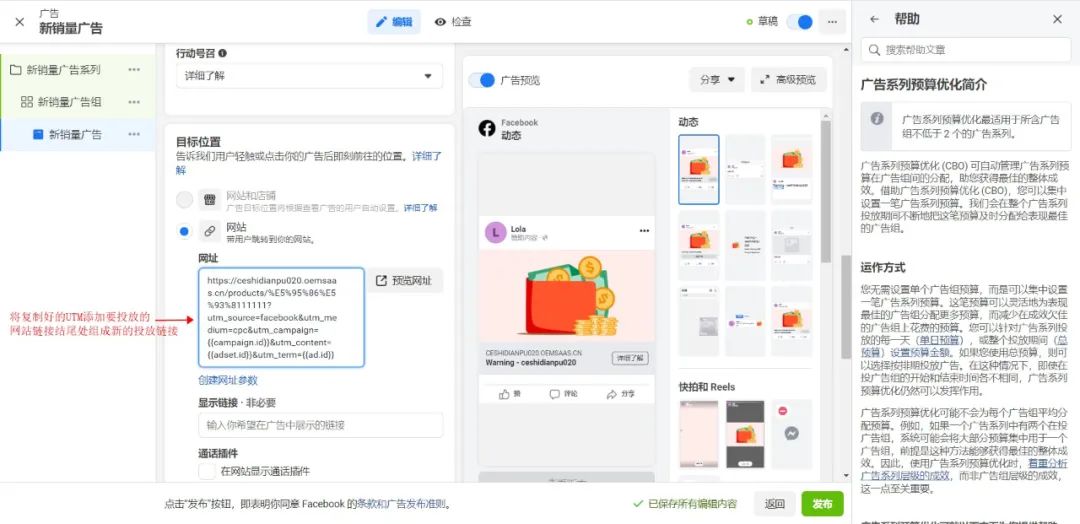
18 [Advertising Board] Next, we create ads, add UTM parameters, and achieve two-way matching of order advertising data. First return to the application interface, click "Advertising Board" and copy the UTM parameters

19 [Advertising Board] When creating an advertisement, add the copied UTM to the end of the website link to be delivered to form a new delivery link. Note: For existing ads that have been created before, you can also paste the UTM parameters after the URL for ad tracking, but the order data that has been generated before will not be counted.
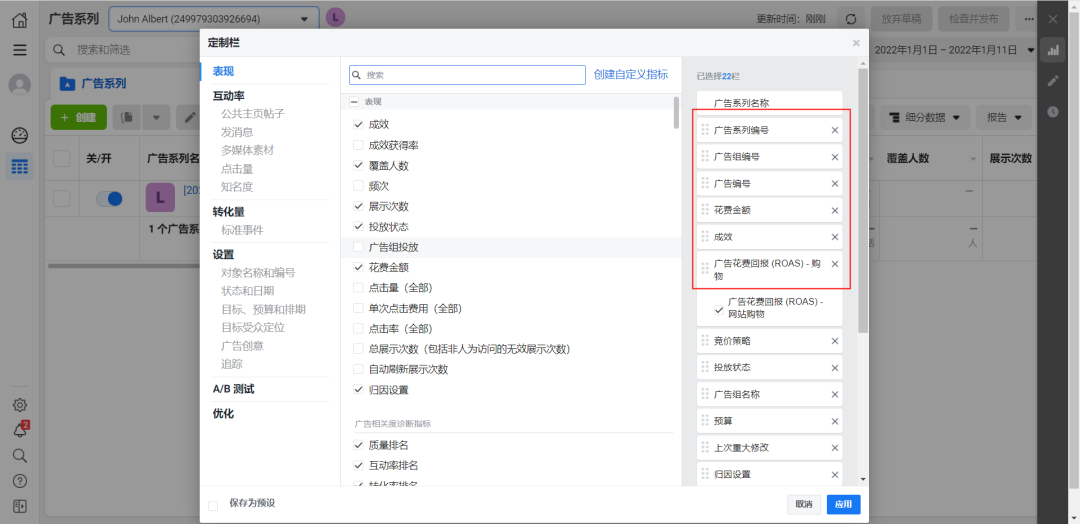
20 [Advertising Board] In the Facebook advertising management tool, enter the advertising campaign, click "Column" in the upper right corner of the data report, and select "Custom Column" in the drop-down box
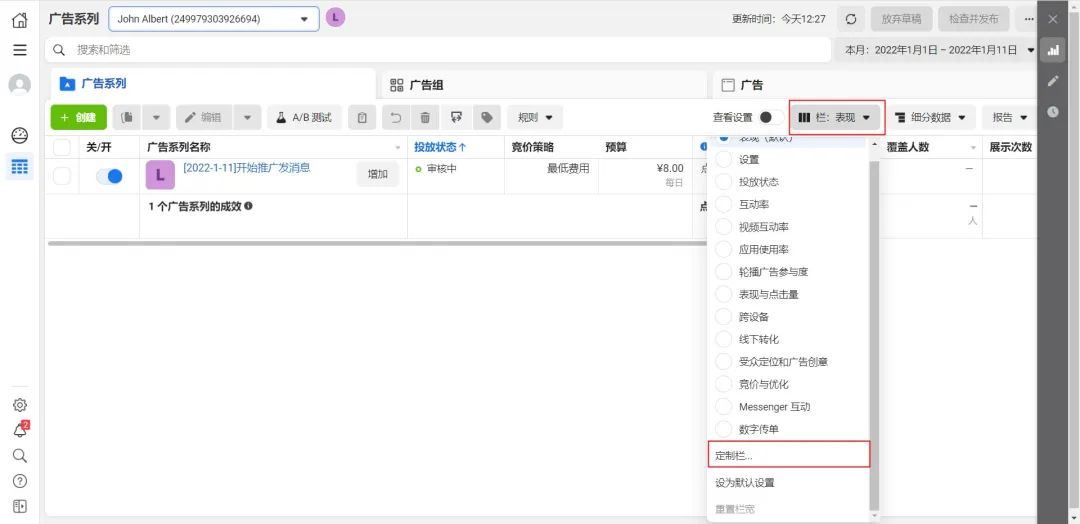
21 [Advertising Board] In the customization column, check the following 6 indicators and adjust the order of display as shown below: Campaign number>Ad group number>Advertising number>Amount spent>Performance>Return on Advertising Spend (ROAS)- Shopping. Note: Please ensure that the above indicator columns are within the visible area
22【Advertising Board】On the advertising data display page, you can see the blue icon of Facebook, and the values displayed in it are the real advertising effectiveness data. Note: If there is no effect, please check whether the plug-in store is configured correctly and the status is turned on. Refresh the page after the check is completed.

23 [Advertising Board] At this point, you have completed all configuration steps related to the advertising board tool. The plug-in will match the data to the corresponding Facebook ad campaign based on the UTM parameters attached to the store order source, so that orders and ads can be accurately matched one-to-one.

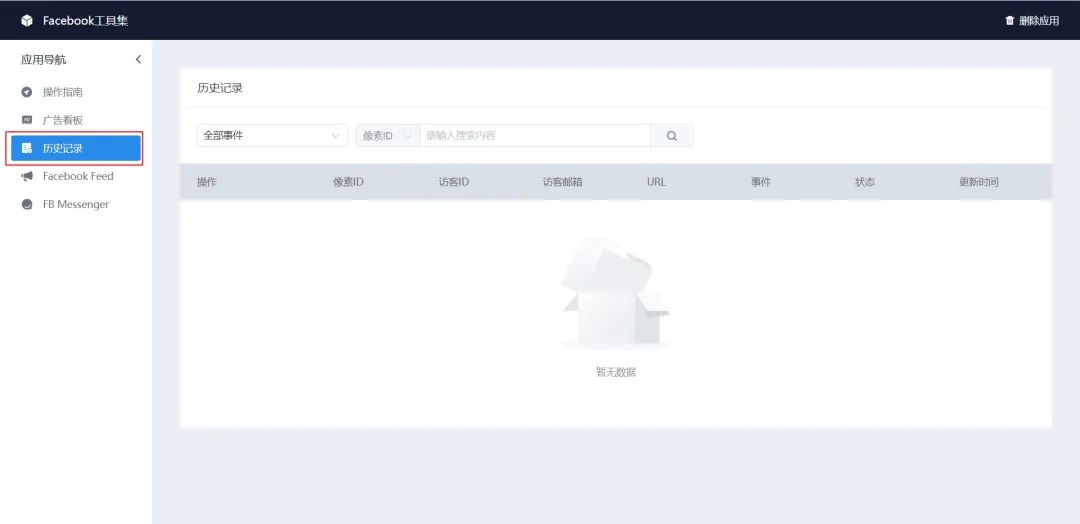
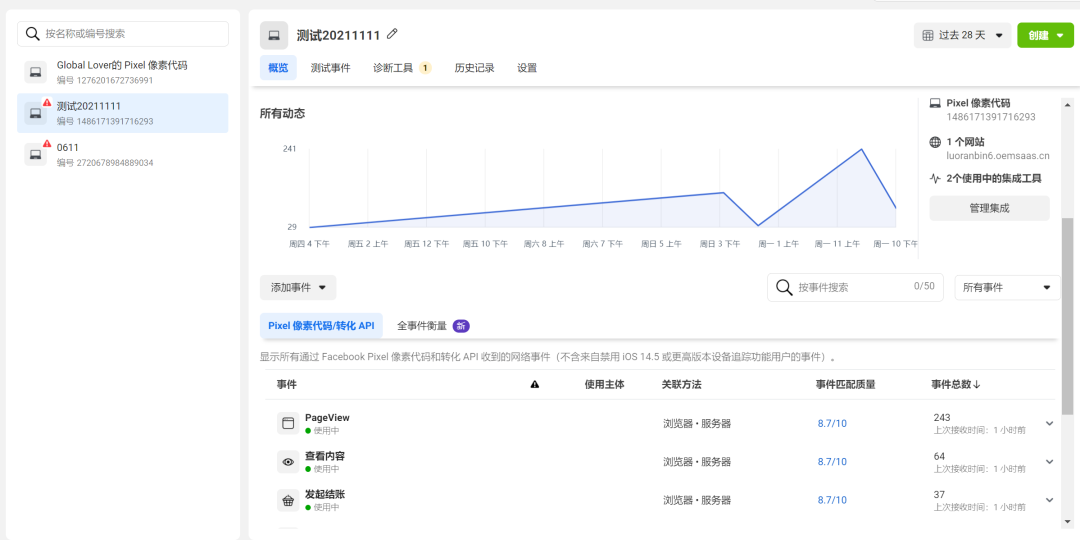
24 [History] You can view Facebook Pixel visitor behavior tracking records in this column. Currently, it supports "View content", "Search", "Add to shopping cart", "Initiate checkout", "Purchase", "Complete registration", There are seven types of events in "Browse Page". Before doing this, you need to complete the Facebook ad pixel configuration
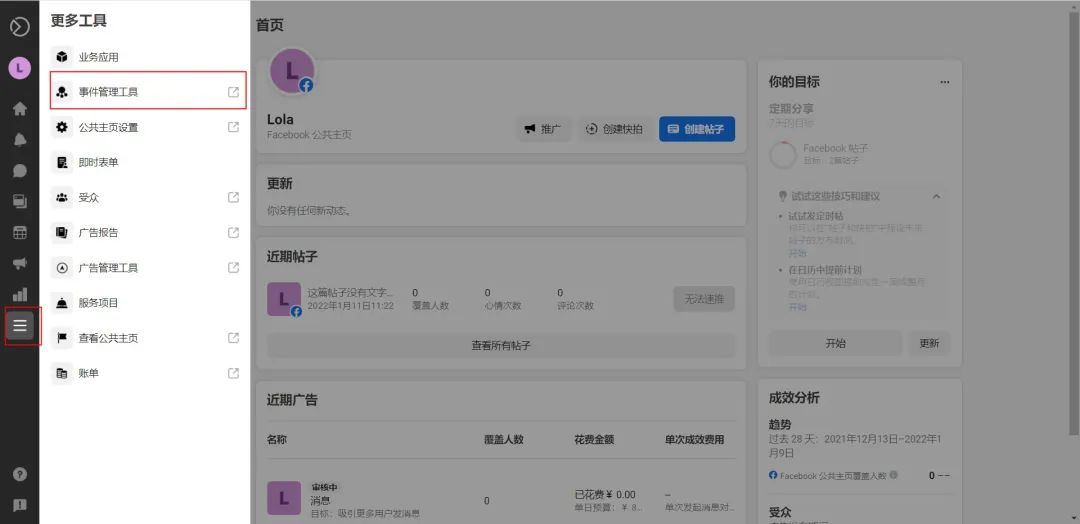
25 [History] First we need to obtain the pixel ID (Facebook Pixel number), enter the Facebook business management platform https://business.facebook.com/, and click "More Tools" → "Event Management Tool"
26 [History] In the data source list, you can get your pixel ID. Please copy this parameter aside for later use.
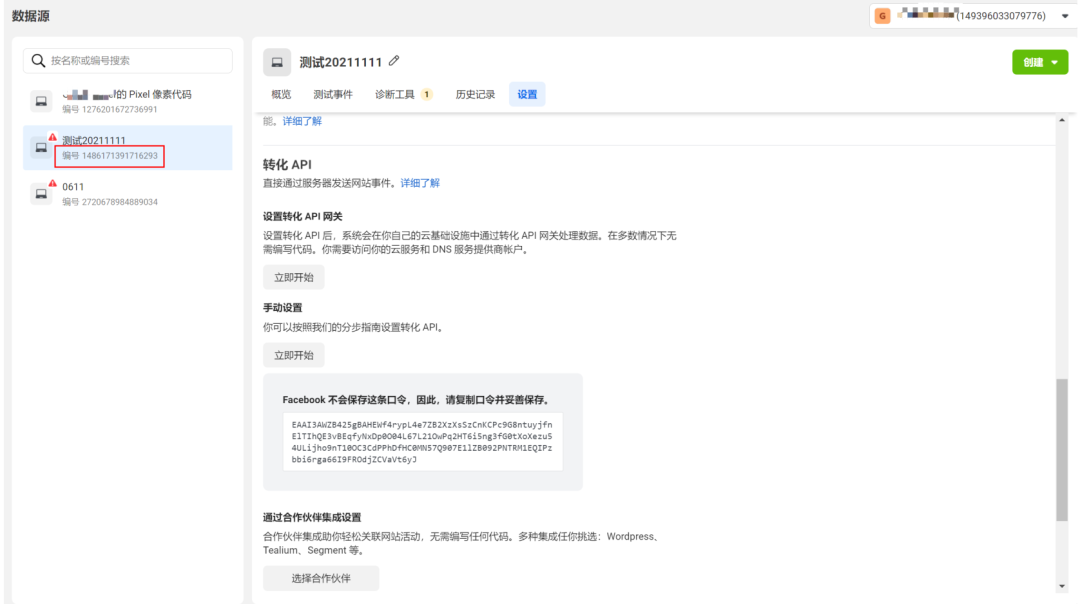
27 [History] Click "Settings", scroll down the page to "Conversion API" → "Manual Settings", and click "Generate Access Password". Note: If the access password cannot be generated, please click "Start Now" and follow the guided process to complete the manual API settings.
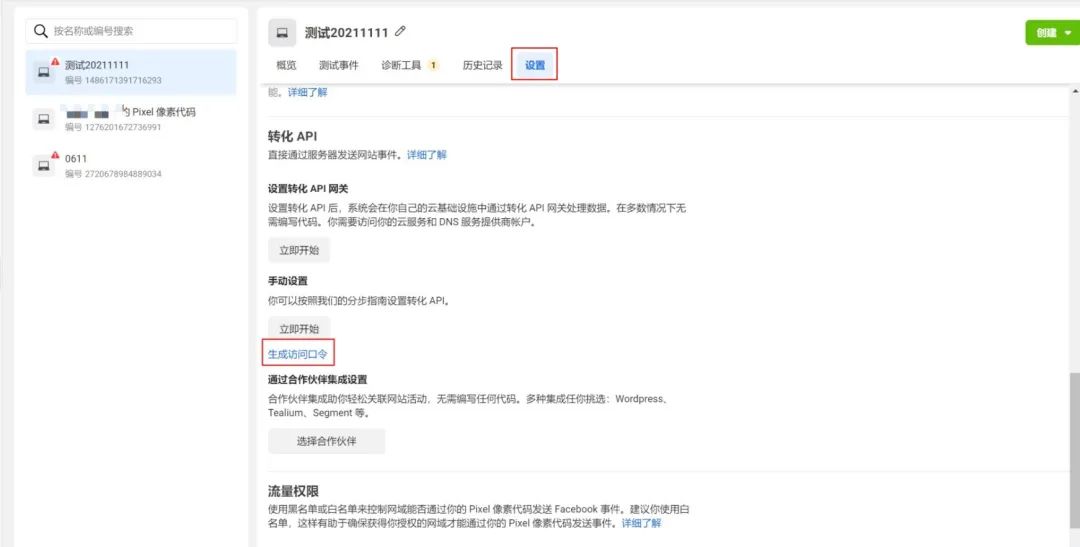
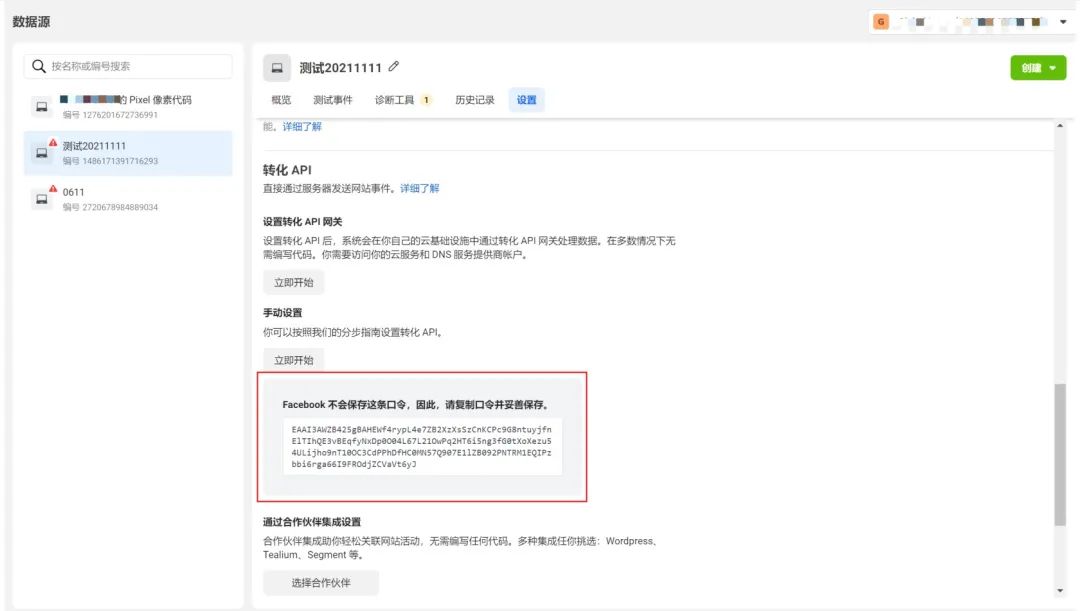
28 [History] Obtained AccessToken, please copy this parameter aside for later use
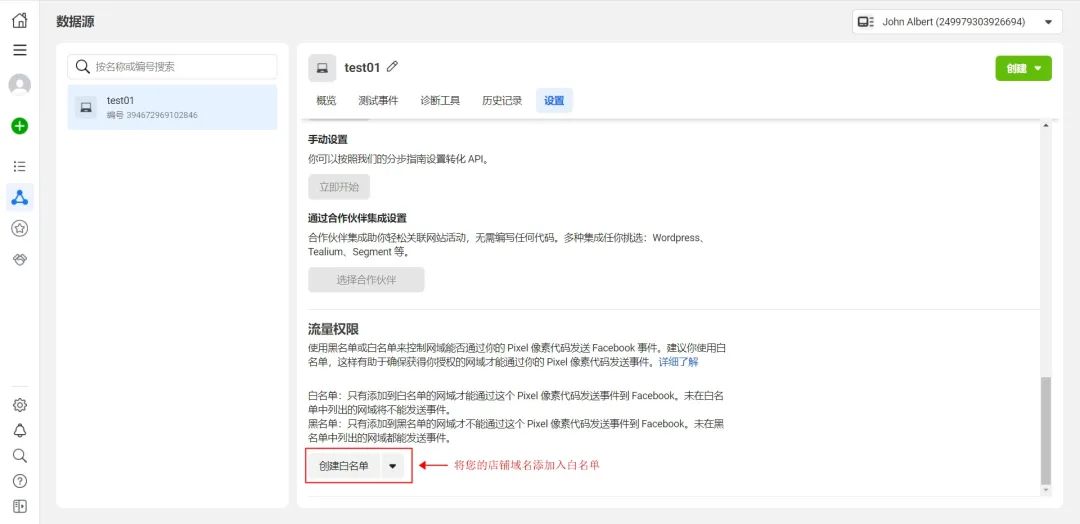
29【History】To ensure that your store can send events through Pixel pixel code, it is recommended that you add your store domain name as a whitelist in the traffic permission module
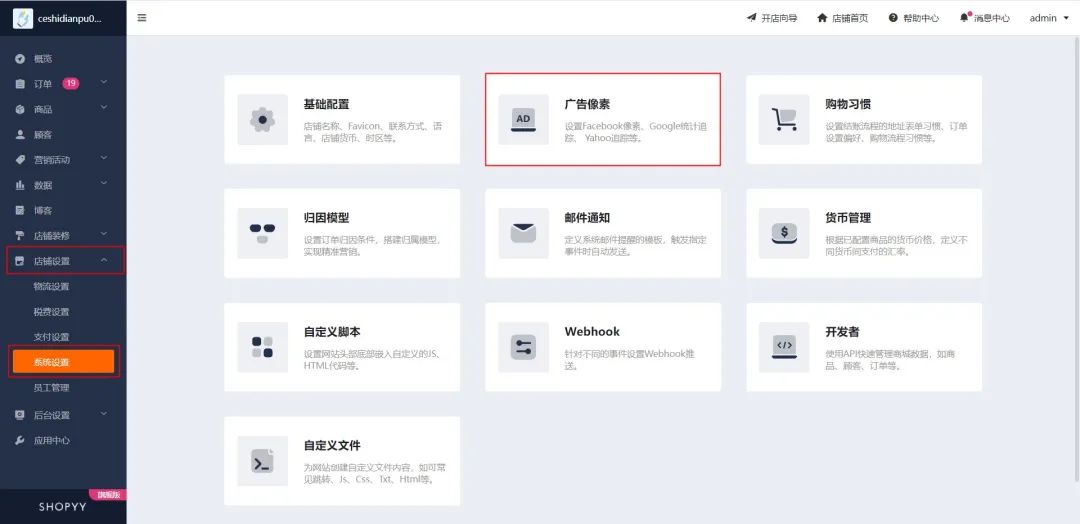
30 [History] Finally, return to the store backend and click "Store Settings" → "System Settings" → "Advertising Pixel"
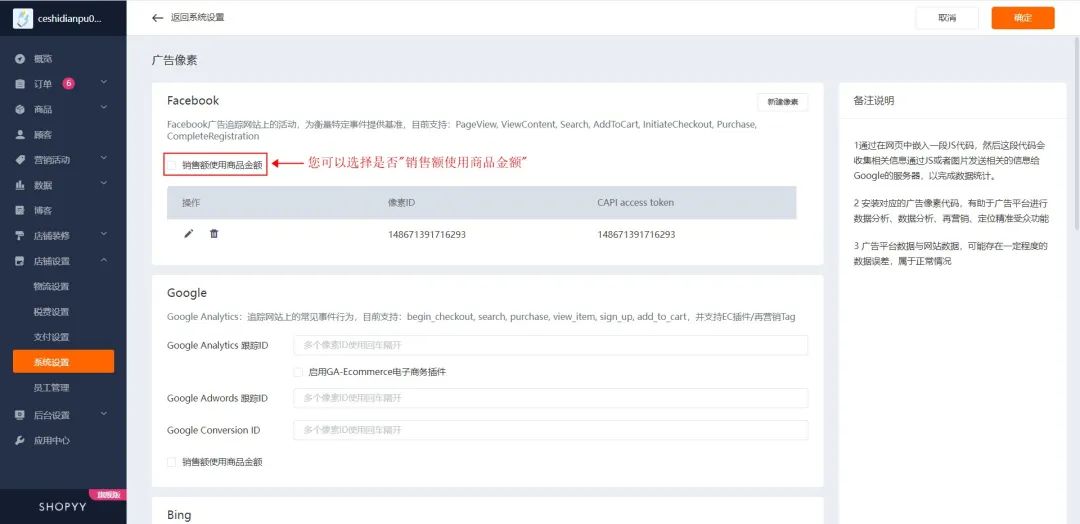
31【History】Create a new pixel in the Facebook module. Copy the pixel ID and CAPI access token obtained previously and fill them in (you can add multiple)
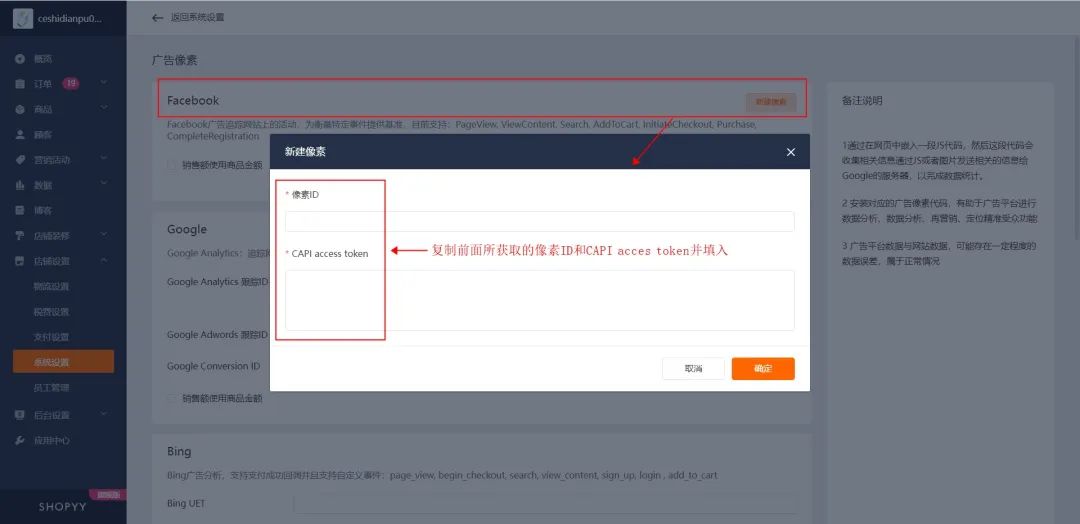
32【History】You can choose whether to "use the product amount for sales". When the purchase event (Purchase) occurs when the table is not checked, the order amount is used as the sales (Value) and passed to the Facebook advertising platform to measure the advertising effectiveness; when the table is checked, the product amount after discount is taken, that is = order product amount - full discount Activity amount-coupon amount
33【History】At this point, you have completed all configuration steps related to history. The system will record the visitor behavior data under the Facebook advertising source in your store. You can view the final data reporting results in the Facebook backend.
Powerful feature set
Due to the privacy policy, the conversion data cannot be collected completely and correctly. Using shopyy's Facebook advertising toolset, you can obtain a variety of Facebook-related capabilities with one click, including advertising boards (auxiliary reporting of Facebook data), historical records (Facebook advertising tracking Event recording), Facebook Feed, FB Messenger, you can configure it according to your needs.
Advertising performance tracking optimization
Track visitor activities through Facebook pixel and record key events of visitors, so that each of your ad placements can correspond to a detailed performance data, allowing you to analyze website conversion effects, build looklike audiences (Looklike Audience), and achieve customer re-engagement. Marketing (Remarketing), of course, you can also use this performance data to measure the success of advertising, and optimize and upgrade advertising quality and strategies.
Advertising results are more accurate
Use the plug-in in the "Advertising Board" to report auxiliary data and upload the store's actual performance data to the Facebook advertising management tool. This can solve the problem of IOS 14 and above being unable to track regular events due to the privacy policy.
Recommended usage scenarios:
1 Record advertising tracking events and analyze advertising conversion funnels
2. Perform crowd positioning, advertising quality and strategy optimization based on advertising effectiveness data
Things to note
1 [Advertising Board] When linking the store's Facebook advertising account, be sure to ensure that the selected time zone is consistent with the time zone of the advertising account, so as to ensure that the relevant performance data is converted and counted correctly.
2 [Advertising Board] After downloading the advertising board tool, please unzip it and add it as a Chrome browser extension. After adding, please do not modify, delete or move the decompressed files, otherwise the functions will not work properly.
3 [Advertising Board] The advertising board tool can only obtain advertising performance data within the visible area. If you need to obtain other advertising data, please pull down the scroll bar vertically. It will be obtained again after the scrolling stops.
4 [Advertising Board] Please pay attention to the mall announcement content. If it prompts that the plug-in version has been updated, please [remove] the advertising board plug-in from the Google "Extensions" module, then re-download the file in the application, unzip and install it again. Get the latest plug-in features
Next, let’s take a look at shopoem, shopyy2.0, how to use the Facebook advertising board tool, log in to the backend, and install the FACEBOOK tool set
1【Advertising Board】You can use this tool to obtain real advertising performance data. First, install the advertising billboard Chrome browser plug-in to connect the store to the Facebook advertising platform. Click the download button to download the Chrome ad billboard tool plug-in
2【Advertising Board】Unzip the downloaded plug-in file. The decompressed file cannot be modified, moved or deleted, otherwise the Chrome plug-in will be unavailable.
3【Advertising Board】Click "┇" in the upper right corner of the browser → "Settings" → "Extensions" to open the Chrome browser plug-in management interface
4【Advertising Board】Enable developer mode
5[Advertising Board] Select the unzipped folder to install the plug-in
6[Advertising Board] will be displayed in the plug-in list after the installation is completed. Please enable the plug-in running status.
7【Advertising Board】For convenience, you can pin the plug-in to the Chrome toolbar
8 [Advertising Board] Open the plug-in and click on store management
9【Advertising Board】Click to add a store to add multiple stores
10 [Advertising Board] I found that some fields need to be filled in in the add store interface. Next, we will collect the corresponding information.
11[Advertising Board] Return to the application interface, click "Advertising Board", and copy the "Gateway Address" and "Secret Key" under this column for later use.
12【Advertising Board】Next, obtain the corresponding advertising ID and advertising time zone from Facebook. Log in to Facebook and enter the advertising management tool
13 [Advertising Board] Get the advertising account number. You can get it from act=advertising account number in the URL link or directly in the account list. Please copy this parameter aside for later use.
14 [Advertising Board] Get the time zone of the advertising account. Click the time filter in the upper right corner. You can easily view the time zone used by the account in the list. Please copy this parameter aside for later use.
15 [Advertising Board] Open the Chrome advertising board tool plug-in again, click "Store Management" → "Add Store", fill in the store name, and copy the previously recorded information into the corresponding input box
16【Advertisement Board】Return to the store management list and you will find that the store has been added successfully.
17 [Advertising Board] After opening the Facebook advertising management backend page, find the Advertising Board Tool plug-in in the plug-in list in the upper right corner, and turn on the "Advertising Board Tool" switch
18 [Advertising Board] Next, we create ads, add UTM parameters, and achieve two-way matching of order advertising data. First return to the application interface, click "Advertising Board" and copy the UTM parameters
19 [Advertising Board] When creating an advertisement, add the copied UTM to the end of the website link to be delivered to form a new delivery link. Note: For existing ads that have been created before, you can also paste the UTM parameters after the URL for ad tracking, but the order data that has been generated before will not be counted.
20 [Advertising Board] In the Facebook advertising management tool, enter the advertising campaign, click "Column" in the upper right corner of the data report, and select "Custom Column" in the drop-down box
21 [Advertising Board] In the customization column, check the following 6 indicators and adjust the order of display as shown below: Campaign number>Ad group number>Advertising number>Amount spent>Performance>Return on Advertising Spend (ROAS)- Shopping. Note: Please ensure that the above indicator columns are within the visible area
22【Advertising Board】On the advertising data display page, you can see the blue icon of Facebook, and the values displayed in it are the real advertising effectiveness data. Note: If there is no effect, please check whether the plug-in store is configured correctly and the status is turned on. Refresh the page after the check is completed.
23 [Advertising Board] At this point, you have completed all configuration steps related to the advertising board tool. The plug-in will match the data to the corresponding Facebook ad campaign based on the UTM parameters attached to the store order source, so that orders and ads can be accurately matched one-to-one.
24 [History] You can view Facebook Pixel visitor behavior tracking records in this column. Currently, it supports "View content", "Search", "Add to shopping cart", "Initiate checkout", "Purchase", "Complete registration", There are seven types of events in "Browse Page". Before doing this, you need to complete the Facebook ad pixel configuration
25 [History] First we need to obtain the pixel ID (Facebook Pixel number), enter the Facebook business management platform https://business.facebook.com/, and click "More Tools" → "Event Management Tool"
26 [History] In the data source list, you can get your pixel ID. Please copy this parameter aside for later use.
27 [History] Click "Settings", scroll down the page to "Conversion API" → "Manual Settings", and click "Generate Access Password". Note: If the access password cannot be generated, please click "Start Now" and follow the guided process to complete the manual API settings.
28 [History] Obtained AccessToken, please copy this parameter aside for later use
29【History】To ensure that your store can send events through Pixel pixel code, it is recommended that you add your store domain name as a whitelist in the traffic permission module
30 [History] Finally, return to the store backend and click "Store Settings" → "System Settings" → "Advertising Pixel"
31【History】Create a new pixel in the Facebook module. Copy the pixel ID and CAPI access token obtained previously and fill them in (you can add multiple)
32【History】You can choose whether to "use the product amount for sales". When the purchase event (Purchase) occurs when the table is not checked, the order amount is used as the sales (Value) and passed to the Facebook advertising platform to measure the advertising effectiveness; when the table is checked, the product amount after discount is taken, that is = order product amount - full discount Activity amount-coupon amount
33【History】At this point, you have completed all configuration steps related to history. The system will record the visitor behavior data under the Facebook advertising source in your store. You can view the final data reporting results in the Facebook backend.
-

Contact email: tech@oemsaas.cn
Company address: Xiamen. Chengdu. Shenzhen. Zhangzhou
- Services +
- Support Developer API
- About +
- About Us Features Partnership
©SHOPOEM 2023 | Fujian ICP No. 08100615-35 | Fujian Public Network Security No. 35020302035286